.png)
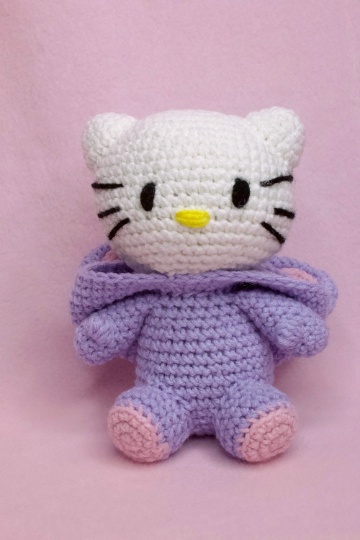
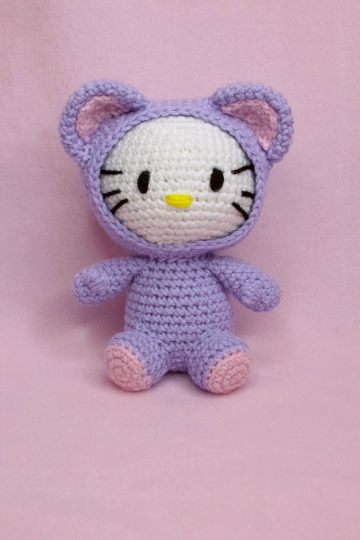
Hooded Hello Kitty Pattern
- Mar 2, 2020
- 4 min read
Updated: Jul 11, 2025
I absolutely adore Hello Kitty and I think those Hello Kitty plushies where she’s wearing various costumes are so adorable that I had to make my own HK with an outfit design of my own!
This pattern was quite a bit complicated to design and I actually ended up scrapping the original design because it just wasn’t quite on the mark. The head from my previous Hello Kitty design was just about perfect as it was, so I just carried that over to the new design and saved myself a little bit of work. I did however increase the body size compared to the old design as I feel this size is way more fitting and she looks a bit chunky and baby-like and I think it’s adorable!
This pattern has quite a bit more pieces than most of my other patterns, and is just a little more on the difficult side, but I think even a beginner can tackle this pattern with a bit of patience.
This is the third installment in my Sanrio character plushies collection, so if you like this pattern, be sure to check out my original Hello Kitty and my Gudetama patterns!
Now, let's get crafting!! :D

This pattern and photos are ©CutiepieCrochet for personal use only. You may not copy, sell, or alter this pattern in any way. You may sell items made from this pattern, but please credit me as the designer.
I would LOVE to see your finished projects! Tag me on Instagram (@cutiepie_crochet)!
Materials Needed:
3.75mm crochet hook
Worsted weight yarn in the colors of your choice
Fiber fill
Stitch markers
Yarn needle
Abbreviations:
mr- magic ring
st- stitch
sc- single crochet
inc- increase
dec- decrease
Head:
Round 1: ch 6 [6]
Round 2: starting in 2nd ch from hook (sc 4, inc)x2 [12]
Round 3: (sc 1, inc)x6 [18]
Round 4: (sc 2, inc)x6 [24]
Round 5: (sc 3, inc)x6 [30]
Round 6: (sc 4, inc)x6 [36]
Round 7: (sc 5, inc)x6 [42]
Rounds 8-16: sc around [42]
Round 17: (sc 5, dec)x6 [36]
Round 18: (sc 4, dec)x6 [30]
Round 19: (sc 3, dec)x6 [24]
Round 20: (sc 2, dec)x6 [18]
Round 21: (sc 1, dec)x6 [12]
Round 22: dec x6 [6]
Stuff firmly, fasten off, and weave in ends.
Ears (optional, but recommended)x2:
Round 1: mr 6 [6]
Round 2: inc 6 [12]
Round 3: sc around [12]
Round 4: (sc 1, inc)x6 [18]
Round 5: sc around [18]
Fasten off, leave a tail for sewing. Stuff lightly and attach to head.
Now is a great time to embroider the face. I like to mark with pins where the eyes, nose, and whiskers should be first, so you get a good idea of where everything should be, and then embroider with yarn.

I usually use a piece of contrasting yarn to mark the middle of the face so that I know nothing should end up crooked. I use 4 embroidery back stitches for the eyes and six for the nose and then I move onto the whiskers when the eyes and nose are on place.
Body:
Round 1: mr 6 [6]
Round 2: inc x6 [12]
Round 3: (sc 1, inc)x6 [18]
Round 4: (sc 2, inc)x6 [24]
Round 5: (sc 3, inc)x6 [30]
Round 6: (sc 4, inc)x6 [36]
Rounds 7-10: sc around [36]
Round 11: (sc 4, dec)x6 [30]
Rounds 12-14: sc around [30]
Round 15: (sc 3, dec)x6 [24]
Rounds 16-17: sc around [24]
Fasten off, leave a long tail for sewing. Stuff firmly, then attach to base of head after hood is attached.
Hood:
Round 1: mr 6 [6]
Round 2: inc x6 [12]
Round 3: (sc 1, inc)x6 [18]
Round 4: (sc 2, inc)x6 [24]
Round 5: (sc 3, inc)x6 [30]
Round 6: (sc 4, inc)x6 [36]
Round 7: (sc 5, inc)x6 [42]
Round 8: (sc 6, inc)x6 [48]
Round 9: (sc 7, inc)x6 [54]
Round 10: (sc 8, inc)x6 [60]
Rounds 11-17: sc around [60]
Round 18: (sc 8, dec)x6 [54]
Round 19: (sc 7, dec)x6 [48]
Fasten off, leave a long tail for sewing. Attach to head, only sew around base of head if you want the hood to be movable.
Hood Ears (outer)x2:
Round 1: mr 6 [6]
Round 2: inc x6 [12]
Round 3: (sc 1, inc)x6 [18]
Round 4: (sc 2, inc)x6 [24]
Round 5: (sc 3, inc)x6 [30]
Rounds 6-7: sc around [30]
Fasten off, leave a long tail for sewing.
Hood Ears (Inner- Accent Color)x2:
Round 1: mr 3 [3]
Round 2: ch 1, inc x3 [6]
Round 3: ch 1, (sc 1, inc)x3 [9]
Round 4: ch 1, (sc 2, inc)x3 [12]
Feet x2:
Start in accent color-
Round 1: mr 6 [6]
Round 2: inc x6 [12]
Round 3: (sc 1, inc)x6 [18]
Switch to main color
Round 4: back loop sc around [18]
Round 5: sc around [18]
Round 6: sc 4, dec x2, sc 10 [16]
Round 7: sc around
Fasten off, leave a long tail for sewing. Attach to base of body in a sitting position.
Arms x2:
Round 1: mr 5 [5]
Round 2: inc x5 [10]
Rounds 3-4: sc around
Round 5: sc 5, bobble st, sc 4 [10]
Rounds 6-10: sc around [10]
Fasten off, leave a long tail for sewing. Attach to sides of body.
Tail (optional):
Round 1: mr6 [6]
Round 2: sc around [6]
Fasten off, sew in half, and attach to body.
For assembly you will want to construct the head first with the ears and embroidery, then add the hood. Sew the inner ears onto the outer ears for the hood and then attach them to the hood, I find attaching the ears easiest when the hood is up. After finishing the hood you’ll want to add the body to the head. You’ll need to sew through the hood layer into the head; this will take a bit of patience. After adding the body to the head you can finish up adding the arms, feet, and tail.


Now you have your very own very snuggly Hello Kitty! If you make one, tag me on Instagram so I can see it! Don’t forget to pin this post on pinterest if you enjoyed it!
If you enjoyed this pattern and can spare a dollar or two, please consider donating to my Ko-Fi! Your donations help pay for blog fees and help me keep making free patterns!