.png)
Mushroom Purse Pattern
- Mar 18, 2022
- 8 min read
Updated: Jul 11, 2025
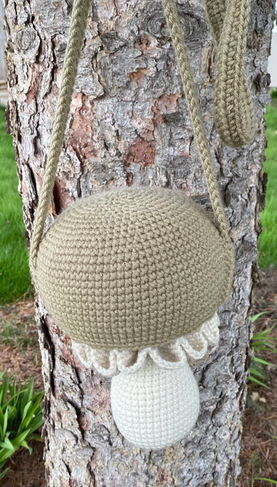
Hey friends! It's time for another Free Pattern Friday!!! This time I'm sharing something that I've been working extra hard on for you! Today we're going to crochet a plush mushroom purse -ooh that's fun to say- plush mushroom purse. This pattern is on the tiny bit more complicated side, but with a bit of patience and perseverance, we can get through it!! As a small note, before we begin, I'd like to mention that this purse will hold my wallet, lipstick, and anything small, but it will not however hold my Iphone as it is too large, so just bear that in mind as you are making this pattern!
Like many of my crochet ideas, this one came to me right as I was falling asleep, so I wrote it down in my phone notes and then promptly forgot that I ever had that idea, until I made my very hobbity cottagecore stays and I knew I needed the perfect accessory to take me to peak hobbit-ness. That's when the mushroom purse came in! Because I know that a hobbit would probably never carry a proper purse, but hobbits love (and I mean LOVE) mushrooms. So who knows, maybe if I was a hobbit back then in Middle Earth I could have started a new trend of wearing mushroom bags when going to The Shire marketplace. One can dream, right?
As mentioned earlier, this pattern is a bit more complicated than just a regular plushie pattern, but I will do my best to walk you all through it as thoroughly as possible! Being a more complex pattern, it also is going to require a few extra materials as well as some new techniques. So, take a look at the materials list, make sure you have everything you need, google any terms you're unsure of (youtube has great video instructions for any stitches you may be unsure of), and let's get making!

This pattern and photos are ©CutiepieCrochet for personal use only. You may not copy, sell, or alter this pattern in any way. You may sell items made from this pattern, but please credit me as the designer.
I would LOVE to see your finished projects! Tag me on Instagram (@cutiepie_crochet)!
Disclosure: This post contains affiliate links, meaning I get a commission if you decide to make a purchase through my links, at no extra cost to you.
For this pattern you will need:
-Worsted weight yarn (size 4), I used Red Heart Super Saver in "Aran" for the stem and ruffles (about 1/2 skein) and Red Heart Super Saver in "Cherry Red" (about 1/2 skein) for the top portion, and then some scrap white yarn I had laying around for the spots.
-9in zipper (optional, consider using a button or two if you don't use a zipper)
-Sewing pins
-Fabric for the lining and matching thread (optional)
-Sewing needle or sewing machine (optional)
-Fiber Fill
Abbreviations:
Mr- magic ring
Inc- increase (sc twice in one stitch)
Sc- single crochet
Dec- decrease (sc two stitches together)
FLO- front loops only (sc in the front loop of each st)
BLO- back loops only (sc only in the back loop of each st)
Fpsc- front post sc (sc under the post of the sitch, working through the front side of the piece)
Ch- chain
St- stitch
Hdc- half double crochet
FO- finish off
Starting in “Aran”:

Round 1: mr 6 [6]
Round 2: inc x 6 [12]
Round 3: (sc 1, inc)x6 [18]
Round 4: sc 1, inc, (sc 2, inc)x5, sc 1 [24]
Round 5: (sc 3, inc)x6 [30]
Round 6: sc 2, inc, (sc 4, inc)x5, sc 2 [36]
Round 7: (sc 5, inc)x6 [42]
Rounds 8-12: sc around [42]
Round 13: (sc 12, dec)x3 [39]
Round 14: sc around [39]
Round 15: (sc 11, dec)x3 [36]
Round 16: sc around [36]
Round 17: (sc 10, dec)x3 [33]
Round 18: sc around [33]
Round 19: (sc 9, dec)x3 [30]
Rounds 20-25: sc around [30]
*switch to your secondary color*
Round 26: FLO, (sc 4, inc)x6 [36]
Round 27: (sc 5, inc)x6 [42]
Round 28: sc 3, inc, (sc 6, inc)x5, sc 3 [48]
Round 29: (sc 7, inc)x6 [54]
Round 30: sc 4, inc, (sc 8, inc)x5, sc 4 [60]
Round 31: (sc 9, inc)x6 [66]
Round 32: sc 5, inc, (sc 10, inc)x5, sc 5 [72]
Round 33: (sc 11, inc)x6 [78]
Round 34: sc 6, inc, (sc 12, inc)x5, sc 6 [84]
Round 35: BLO sc around [84]
Round 36-37: sc around [84]
*Pause doing this next part of the main mushroom to do the ruffles and the patch for the stem hole, it makes it much easier to do*
Round 38-45: sc around [84]
Round 46: sc 1, ch length of your zipper, mine is 32st long so that’s what I’ll use here, but change it to the number you need. So, ch32 (be sure not to ch too tightly or it will end up shorter than it needs to be), skip 32 st of last round and join with a sc, continue to sc around rest of round [84]
Round 47-48: sc around [84]
*Pause right here to attach the zipper and liner (instructions below) if you are going that route. You can definitely choose not to stuff the top portion of the purse and leave out the lining, just keep in mind that it will be a lot less structured, but it will hold more stuff!*
Round 49: sc 6, dec, (sc 12, dec)x5, sc 6 [78]
Round 50: (sc 11, dec)x6 [72]
Round 51: sc 5, dec, (sc 10, dec)x5, sc 5 [66]
Round 52: (sc 9, dec)x6 [60]
Round 53: sc 4, dec, (sc 8, dec)x5, sc 4 [54]
Round 54: (sc 7, dec)x6 [48]
Round 55: sc 3, dec, (sc 6, dec)x5, sc 3 [42]
Round 56: (sc 5, dec)x6 [36]
Round 57: sc 2, dec, (sc 4, dec)x5, sc 2 [30]
Round 58: (sc 3, dec)x6 [24]
Round 59: sc 1, dec, (sc 2, dec)x5, sc 1 [18]
Round 60: (sc 1, dec)x6 [12]
Round 61: dec x6 [6]
FO, weave in ends.
As far as stuffing is concerned, I like to add a light layer of stuffing under the lining pouch after it's sewn in and then medium-firmly stuff the rest as you continue on with your decrease rows. It's up to you, how firmly you decide to stuff it, but just keep in mind, the more you stuff, the less room there will be to actually put things in your purse and if you stuff it too much it may become difficult to zip and unzip your purse.
Ruffles in “Aran”:
When I start this part, I like to tuck rows 26-37 as much as possible into the unstuffed stem to make everything easier to hold and work with.
Round 1: fpsc into row 25 and sc in every stitch [30]
Round 2: sc 3 in every st around [90]
Round 3: sc 2 in every st around [180]
Rounds 4-7: sc around [180]
FO leaving long tail for sewing. Before you continue on with the top of the mushroom, you will want to secure the ruffles down. What I find easiest is using stitch markers to pin the ruffles in place exactly where I want them and then when everything is to my liking I sew them in place. Be careful not to tangle your working yarn into what you’re sewing!


Patch for the Stem (in either color):

Round 1: mr 6 [6]
Round 2: inc x6 [12]
Round 3: (sc 1, inc)x6 [18]
Round 4: sc 1, inc, (sc 2, inc)x 5, sc 1 [24]
Round 5: (sc 3, inc)x6 [30]
FO, leave long tail for sewing, sew onto the hole on top of the stem, stuffing stem firmly before closing all the way.
On attaching the zipper and lining:
If attaching a zipper, I find it easiest to attach the bottom first, with the zipper closed, using a running backstitch, then attach the top of the zipper in the same manner. It helps greatly to pin everything into place so that it doesn't get warped and wrinkly, but do watch that you don't prick your fingers. Continue on to add your lining.


For the lining I like to trace the circumference of the mushroom top , giving about 1/4 inch seam allowance for sewing and adding a bit of a rectangular strip the length of the opening (see picture). Sew the pieces right sides together, do not sew the rectangular part shut, you'll sew that portion to the opening where we made the opening for the zipper.


If you would like, or if you are not adding a zipper, I recommend adding a flap to cover the opening that way your stuff doesn't fall out (:
Small spot (in white):
Round 1: mr 6 [6]
Round 2: inc x 6 [12]
FO, leaving a long tail for sewing, attach to mushroom top.
Medium Spot (in white):
Round 1: mr 6 [6]
Round 2: inc x 6 [12]
Round 3: (sc 1, inc)x6 [18]
FO, leaving a long tail for sewing, attach to mushroom top.
Large Spot (in white):
Round 1: mr 6 [6]
Round 2: inc x 6 [12]
Round 3: (sc 1, inc)x6 [18]
Round 4: sc 1, inc, (sc 2, inc)x 5, sc 1 [24]
FO, leaving a long tail for sewing, attach to mushroom top.
Half spot (in white):
Round 1: mr 3 (3)
Round 2: ch 1, flip work, inc x 3 (6)
Round 3: ch 1, flip work (sc 1, inc)x3 (9)
FO, leaving a long tail for sewing, attach to mushroom top.
For my purse, I made 2 small spots, 2 medium spots, 1 large spot, and 1 half spot and I spread them out trying to make as random a pattern as possible.

Strap (in secondary color):
Row 1: Ch desired length, leave a long length of yarn before starting the ch so you can sew down later. Make sure when doing this part that you don't crochet too tightly or the next row will be very difficult and take a long time. I recommend practicing a short piece a few times if this is an unfamiliar technique.
Row 2: Hdc in back loop of each chain st (there's a really good video explaining this process here)
Row 3: Hdc in each st of previous row.
FO, leave long tail for sewing. I like to fold the ends in half about 2 inches and then sew down the two layers with a running backstitch in a rectangle shape; to make it even more secure, you can sew an X through the middle of the rectangle.
Cover/Flap (in secondary color):
Ch the length of the zipper, plus a couple stitches, for mine I went with 35 st
Row 1: sc in the 2nd ch from your hook, sc across [34]
Row 2-5: ch 1, sc across
FO, leaving a long tail for sewing, sew above zipper opening, weave in ends
If not adding a zipper, you can secure the flap by adding a ch loop in the middle of the piece and then adding a button onto the purse for the loop to go over.


Once you have all the pieces put together, then your purse is all done! I hope you have a lot of fun making your very own mushroom purses! If you end up making this pattern, I would love to see it, so please tag me on Instagram @cutiepie_crochet!
That's all for this pattern, and I'll see you here again soon for another free pattern soon! If you like this pattern please help the blog out by sharing it! <3
If you enjoyed this pattern and can spare a dollar or two, please consider donating to my Ko-Fi! Your donations help pay for blog fees and help me keep making free patterns!