.png)
Mushroom Trio Pattern
- Jan 27, 2023
- 5 min read
Updated: Jul 11, 2025
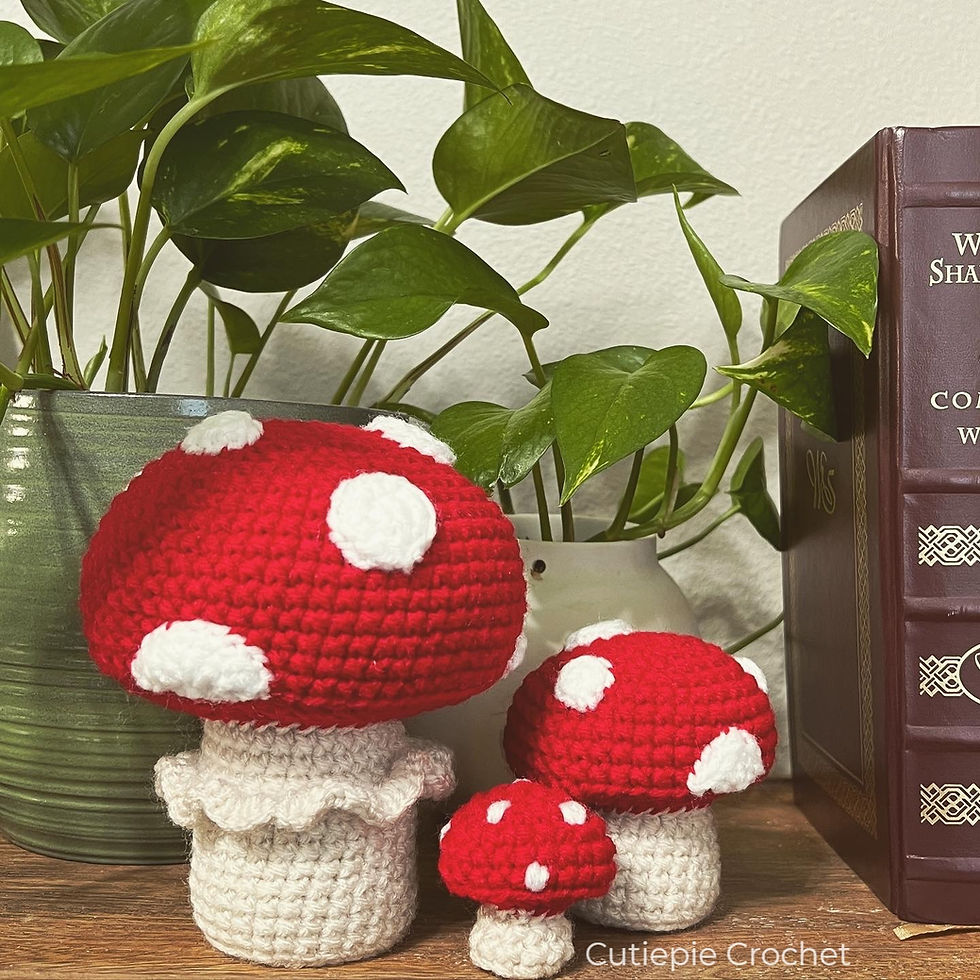
Hey everyone!! Welcome back to a new free pattern Friday!! I know every week I say I’m really excited to share that pattern with you all, but this one might be my most excited yet! I just absolutely love the versatility of these mushrooms and all the different patterns and colors you can give them! Stick around til the end of the post to see all the different variations I came up with while writing this pattern!
I’ve been really wanting to make something else mushroom themed since I wrote the mushroom purse pattern and when I started thinking about redecorating my office, this pattern idea came to me. I wanted something small-ish that would sit nicely on a shelf with my live plants to tie them in with all the yarn in my stash. Crochet mushrooms are so perfect for this, because not only are they cute and made of yarn, but they’re also kind of plants! Plus, now I have this wonderful cottage-core vibe going on!
This pattern is super easy and straightforward and can be customized all kinds of ways! In this pattern, you can make three different sizes of mushrooms; small, medium, and large. You can leave off the ruffle and spots or add gems or beads! It’s just so “mush” fun to customize them! Heh. Mush.. Get it?? *ahem* Anyway, let’s just get into the pattern, shall we?
~This pattern and photos are ©CutiepieCrochet for personal use only. You may not copy, sell, or alter this pattern in any way. You may sell items made from this pattern, but please credit me as the designer.
I would LOVE to see your finished projects! Tag me on Instagram (@cutiepie_crochet)!
Disclosure: This post contains affiliate links, meaning I get a commission if you decide to make a purchase through my links, at no extra cost to you.
For this pattern you will need:
-Worsted weight yarn (size 4)
-Polyester Fiber Fill
Abbreviations:
Mr- magic ring
St- stitch
Sc- single crochet
Inc- increase (sc twice in one stitch)
Dec- decrease (sc two stitches together)
FO- finish off
BLO- back loops only
Small Mushroom:

Stem (in Aran):
Round 1: mr 6 [6]
Round 2: inc x6 [12]
Round 3: BLO, sc around [12]
Rounds 4-5: sc around [12]
FO, hide tail, lightly stuff if you want. I usually do not because I find it harder to get them to stay standing when they’re stuffed.
Cap (in secondary color):
Round 1: mr 6 [6]
Round 2: inc x6 [12]
Round 3: (sc 1, inc)x6 [18]
Round 4: sc 1, inc (sc 2, inc) x5, sc 1 [24]
Rounds 5-6: sc around [24]
Round 7: BLO (sc 2, dec)x6 [18]
Round 8: (sc 1, dec)x6 [12]
Tie off, stuff lightly. If making Amanita, embroider spots, I used french knots to make the spots once, but it was pretty difficult. If you embroider with the French knots, I highly recommend doing in the middle of a stitch (where there’s a little “x”) instead of in between stitches or else the knot will likely just pull through.
Medium Mushroom:

Stem (in Aran):
Round 1: mr 6 [6]
Round 2: inc x6 [12]
Round 3: (sc 1, inc) x6 [18]
Round 4: sc 1, inc (sc 2, inc) x5, sc 1 [24]
Round 5: BLO sc around [24]
Rounds 6-10: sc around [24]
Tie off, leaving long tail for sewing. Stuff lightly.
Cap:
Round 1: mr 6 [6]
Round 2: inc x6 [12]
Round 3: (sc 1, inc)x6 [18]
Round 4: sc 1, inc (sc 2, inc) x5, sc 1 [24]
Round 5: (sc 3, inc) x6 [30]
Round 6: sc 2, inc (sc 4, inc)x5, sc 2 [36]
Round 7: (sc 5, inc)x6 [42]
Rounds 8-11: sc around [42]
Round 12: BLO (sc 5, dec)x6 [36]
Round 13: sc 2, dec, (sc 4, dec)x5, sc 2 [30]
Round 14: (sc 3, dec)x6 [24]
Tie off, hide the tail. Stuff to medium firmness, not so stuffed that it affects the shape of the flat part of the cap.
Small spot (make 2):
Mr 6, ss into first st, tie off leaving a long tail for sewing.
Medium spot (make 1):
Round 1: Mr 6
Round 2: (Sc, inc)x3
Ss into first st, tie off leaving a long tail for sewing.
Half spot (make 2):
Row 1: Mr 3, ch 1
Row 2: Turn work, sc, inc, sc
Tie off, leaving a long tail for sewing.
Large Mushroom:

Stem:
Round 1: mr 6 [6]
Round 2: inc x6 [12]
Round 3: (sc 1, inc) x6 [18]
Round 4: sc 1, inc (sc 2, inc) x5, sc 1 [24]
Round 5: (sc 3, inc)x6 [30]
Round 6: BLO sc around [30]
Rounds 7-17: sc around [30]
Tie off, leaving a long tail for sewing. Stuff to light/medium firmness.
Round 14a: If adding a ruffle, go back to between rounds 14 and 15 and surface sc around the stem.
Round 14b: place 3 stitches in every stitch around. Ss into first st and tie off. Weave in ends.
Cap:
Round 1: mr 6 [6]
Round 2: inc x6 [12]
Round 3: (sc 1, inc) x6 [18]
Round 4: sc 1, inc (sc 2, inc) x5, sc 1 [24]
Round 5: (sc 3, inc) x6 [30]
Round 6: sc 2, inc (sc 4, inc)x5, sc 2 [36]
Round 7: (sc 5, inc)x6 [42]
Round 8: sc 3, inc, (sc 6, inc)x5, sc 3 [48]
Round 9: (sc 7, inc)x6 [54]
Round 10: sc 4, inc, (sc 8, inc)x5, sc 4 [60]
Rounds 11-18: sc around
Round 19: BLO sc 4, dec, (sc 8,dec)x5, sc 4 [54]
Round 20: (sc 7, dec)x6 [48]
Round 21: sc 3, dec, (sc 6, dec)x5, sc 3 [42]
Round 22: (sc 5, dec)x6 [36]
Round 23: sc 2, dec, (sc 4, dec)x5, sc 2 [30]
Tie off, hide tail. Stuff to medium firmness, but not so stuffed that it affects the shape of the flat part of the cap.
Spots:
Small (make 2):
Round 1: mr 8 [8]
Ss into first st and tie off, leaving tail for sewing.
Large (make 3):
Round 1: mr 6 [6]
Round 2: inc x6 [12]
Ss into first st of round 2 and tie off, leaving tail for sewing
Half small (make 1):
Row 1: mr 3, ch 1, turn [3]
Row 2: inc x3 [6]
Tie off, leaving tail for sewing.
Half large (make 1) :
Row 1: mr 3, ch 1, turn [3]
Row 2: inc x3, ch1, turn [6]
Row 3: (sc 1, inc)x3 [9]
Tie off, leaving tail for sewing.

Now it is time for assembly! Attach the stems to the caps and lightly stuff the hole as you’re closing it. To make your mushroom stand without wobbling, don't clip the yarn after attaching the cap to the stem. Bring your needle down through the base of the mushroom (I like to do it over the top of the mr) and bring it back up through the stem and tie it off back up at the top of the stem, pulling slightly so that the base is a little concave. Don’t pull too tight or it will make the rest of the stem start to change shape.
After you’re done with that, just add the spots if you wish and you are all set!
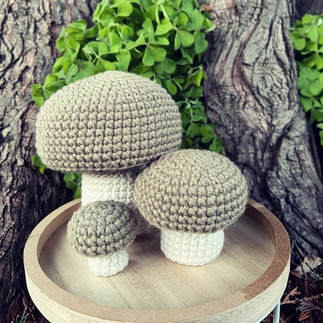
As promised, here are the different variations I made while making this pattern!!


Thank you so much for joining me today to make this fun little mushroom trio! I hope you have fun making them and if you do, you should email me at crochet_things@yahoo.com or tag me on Instagram @cutiepie_crochet and show me your finished plushies! <3
That is all for this week's pattern! I can't wait to see you here next time! Until then, HAPPY CROCHETING! <3
If you enjoyed this pattern and can spare a dollar or two, please consider donating to my Ko-Fi! Your donations help pay for blog fees and help me keep making free patterns!


