.png)
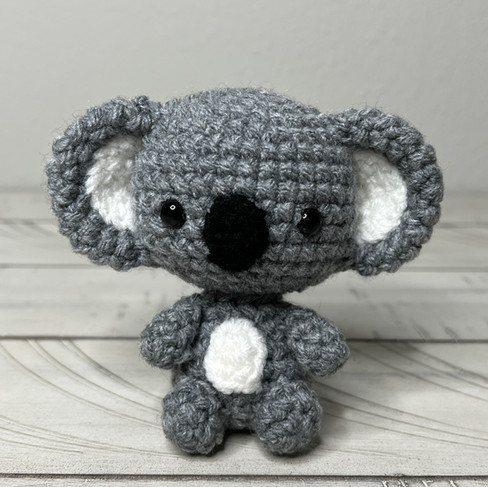
Kenny the Mini Koala Pattern
- Aug 10, 2018
- 4 min read
Updated: Jul 11, 2025
This pattern has been updated as of 3/10/2023 to be more clear, with more photos!
***You can purchase an INEXPENSIVE AD-FREE PDF of this pattern on Etsy! The pattern is concise, downloadable, and printable and your purchase helps me to continue putting out free patterns!***
When I was asked to make a koala keychain I was a little worried that I wouldn’t be able to make it small enough because I’m not great at crocheting small things, but this turned out to be the right size to be a chunky keychain. I honestly think it’d be super cute as an accent piece on a backpack, so here’s my koala pattern, just in time for back to school! This is totally a beginner friendly pattern, so you dont need to worry if you’re koala-fied to make it or not! (Sorry, I couldn’t resist making a cringey pun!)
I’ve also made it as a kawaii shelf decoration, because I just love decorating with mini plushies!

~If you have any questions about the pattern, or you just want to send me a picture of your finished project please contact me at contact.cutiepiecrochet@gmail.com! Feel free to make and sell these, but please do not mass produce! If you would like to share this pattern, please link to this page, but do not reprint it on your site. Also, please credit me when using this pattern by tagging me @cutiepie_crochet on Instagram. Thanks, and have lots of fun making your new plushie friend!~
Disclosure: This post contains affiliate links, meaning I get a commission if you decide to make a purchase through my links, at no extra cost to you.
Materials:
Worsted weight yarn in the colors of your choice
8mm safety eyes
Fiber fill
Pins
Abbreviations:
mr- magic ring
st- stitch
sc- single crochet
inc- increase
dec- decrease
FO- fasten off
This pattern can be made as a keychain or a mini plush! If you decide you want it to be a keychain you will need a keychain and a jump ring!

Head:
Round 1: mr 6 (6)
Round 2: inc x6 (12)
Round 3: (sc 1, inc)x6 (18)
Round 4: (sc 2, inc)x6 (24)
Round 5: (sc 3, inc)x6 (30)
Round 6: (sc 4, inc)x6 (36)
Round 7-12: Sc around (36)
Between rows 10 and 11 attach safety eyes 6 stitches apart
Round 13: (sc 4, dec)x6 (30)
Round 14: (sc 3, dec)x6 (24)
Round 15: (sc 2, dec)x6 (18)
Round 16: (sc 1, dec)x6 (12)
Round 17: decx6 (6)
Tie off. Hide rest of string. Stuff evenly.
Body:
Round 1: mr 6 (6)
Round 2: inc x6 (12)
Round 3: (sc 1, inc)x6 (18)
Round 4: (sc 2, inc)x6 (24)
Round 5-6: sc around (24)
Round 7: (sc 2, dec)x6 (18)
Round 8: sc around (18)
Round 9: (sc 1, dec)x6 (12)
Tie off, leaving long tail for sewing. Stuff evenly.
Nose:
Round 1: ch 3
Round 2: starting in 2nd ch from hook, sc 1, inc, turn to unworked side of ch and place sc 1, inc (6)
Tie off, leaving long tail for sewing.
Outer Ears (x2):
Round 1: mr 6 (6)
Round 2: inc x6 (12)
Round 3: (sc 1, inc)x6 (18)
Round 4: (sc 2, inc)x6 (24)
Round 5-6: sc around (24)
Tie off, leaving long tail for sewing.
Inner Ears (x2):
Round 1: mr 3 (3)
Round 2: ch 1, flip work, inc x 3 (6)
Round 3: ch 1, flip work (sc 1, inc)x3 (9)
Tie off, leaving long tail for sewing.
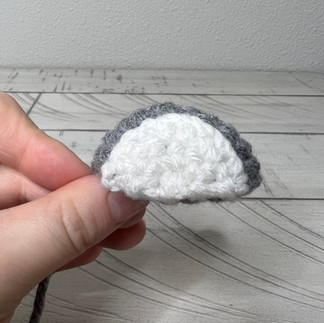
Fold the outer ear in half, so that it now looks like a half-circle and then attach the inner ear by lining up the flat part of both pieces and sewing around the perimeter. I like to use stitch markers to hold the pieces together while I'm sewing rather than using pins. Make sure you leave the tail of the outer ear so you can attach it to the head later.


Tummy Patch:
Round 1: mr 6 (6)
Round 2: sc 2 and tie off, leaving a long tail for sewing. (6)
Arms (x2):
Round 1: mr 6 (6)
Round 2-4: sc around (6)
Sew opening in half, leaving long tail for sewing.
Legs (x2):
Round 1: mr 8 (8)
Round 2-3: sc around (8)
Fasten off, weave in ends so the hole is closed, pull yarn through middle of piece (round 2), leave extra yarn for sewing. Pinch flat, so the leg is now an oval.


Assembly:
Now that you have all your pieces, it's time to put them all together! Starting with the basics, go ahead and attach the body to the bottom of the head (I like to sew through the front loops of the last round of each piece to that it joins seamlessly). After that's all finished, I like to add all the features to the face, starting with the nose and then moving on to the ears. Then I like to sew on the tummy patch, followed by the arms, and finishing with the legs! After that, your cute little koala is all finished and ready to accompany you on all your adventures in the outback!


Enjoy your new plush friend! I would totally love to see your finished projects, so tag me on Instagram @cutiepie_crochet!